Reporting Ubuntu System Information to Home Assistant via MQTT
When you use Home Assistant, you naturally want to integrate more devices into it. While it comes with many built-in integrations, integrating general-purpose computing devices still depends on the devices themselves being able to provide information.
Initially, I added some Raspberry Pi device nodes, hoping to monitor their status. I found a project online called RPi-Reporter-MQTT2HA-Daemon, which can report the status of a Raspberry Pi to Home Assistant via MQTT. It seemed very convenient, so I installed it on these devices. However, new needs arose later that this project couldn’t meet. Inspired by it, I developed ubuntu-mqtt2ha-reporter to report the status of devices running Ubuntu to Home Assistant.
Motivation
As mentioned earlier, RPi-Reporter-MQTT2HA-Daemon is very convenient. You install it on a device and run it, and the device and its related sensors automatically appear in Home Assistant. So why did I develop a separate project? There are several reasons.
The biggest reason, of course, is that this project is limited to Raspberry Pi. Although I initially bought a few Raspberry Pis to deploy as device nodes, I increasingly found them to be neither cheap nor high-performing. There are many used SFF (Small Form Factor) x86 devices on the market from corporate phase-outs, sometimes costing less than A$100. They are often in great condition, coming with a case, power supply, and more stable storage, as well as a faster CPU and more RAM. Aside from being slightly larger and perhaps consuming a bit more power, their performance is a tier above the Raspberry Pi at a similar price point.1 After acquiring a few of these devices, I started needing a reporting service that could run on non-Raspberry Pi hardware.
My initial idea was to fork that project and modify the code to make it less Raspberry Pi-specific. But upon looking at its code, I found several issues:
- Many parts of it are based on the assumption that it’s running on a Raspberry Pi. Besides fetching Raspberry Pi device information, a lot of other data relies on the specific structure of the Raspberry Pi system, such as file system and network information.
- It puts all the data into the attributes of an
Updatedsensor, a practice that is discouraged by the official Home Assistant documentation. - I didn’t like its code structure. Because it uses Python and aims for easy deployment, the entire codebase is concentrated in a single file. Nearly two thousand lines of code together are very difficult to navigate.
- Furthermore, the code lacks not only tests but also type information, making it hard to ensure that modifications won’t cause problems without being thoroughly familiar with it.
Therefore, I decided to build a service from scratch using Rust that would meet my own needs. It didn’t need to have all the features of the original project, but at a minimum, it had to run on x86 devices, still be easy to deploy, and have a clearer, more extensible code structure to facilitate adding more features.
Design and Implementation
The entire service runs on the Tokio asynchronous framework, uses rumqtt to handle MQTT connections, and uses the TOML format for configuration files2, with Serde simply used for definition and parsing.
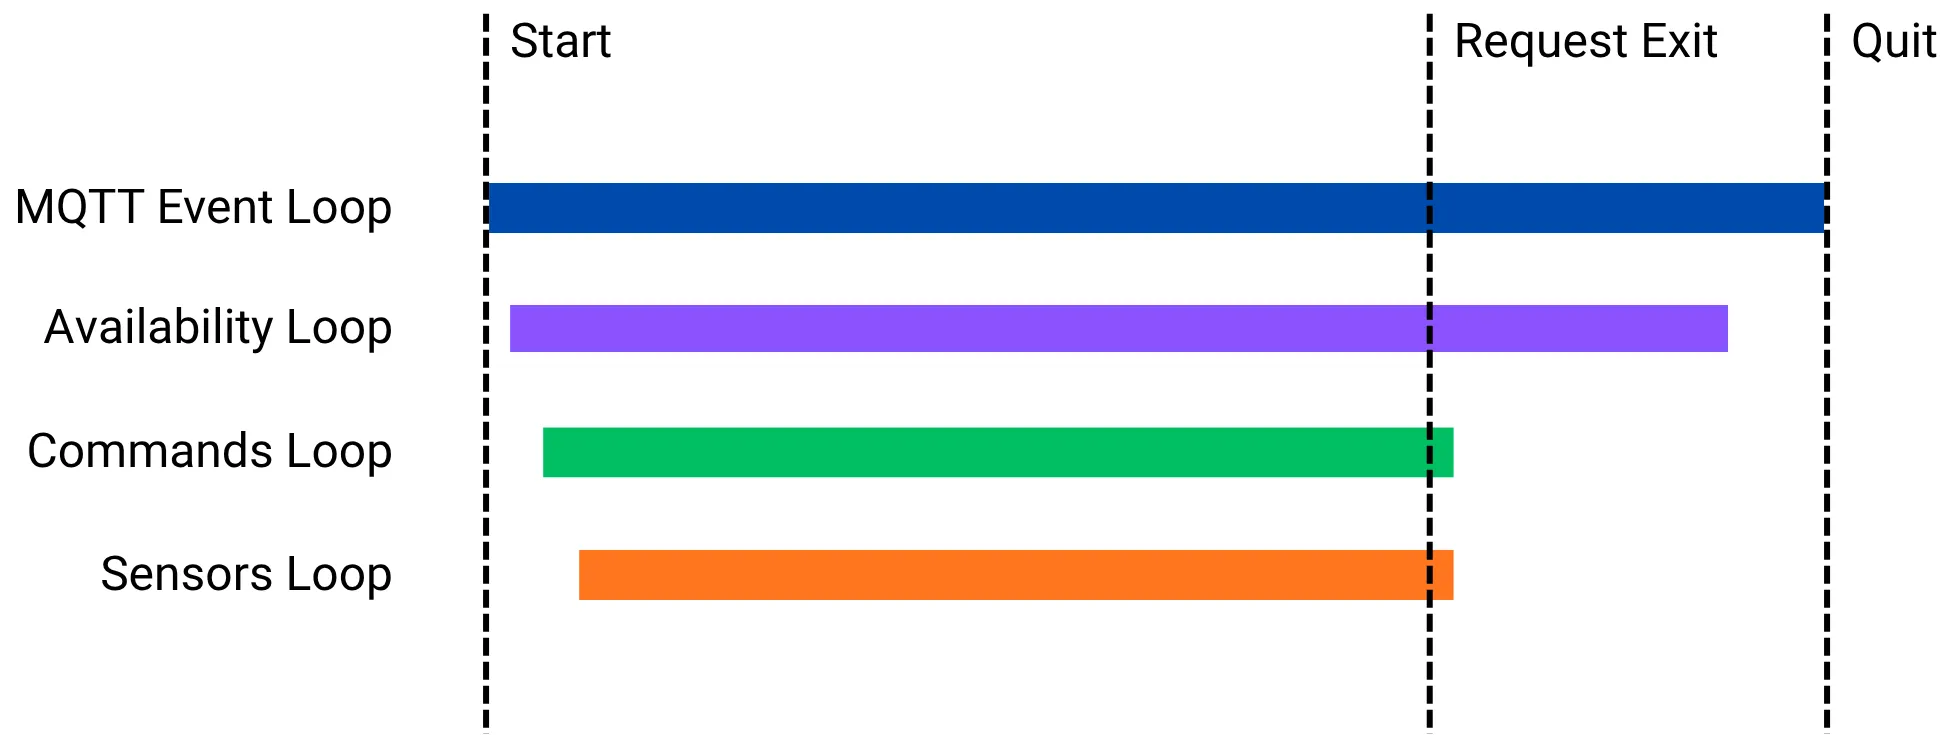
The service’s main loop consists of four independently running loops: the MQTT client’s event loop, periodic availability publishing, command processing, and periodic sensor status publishing.
Sensors
Each type of sensor is implemented in a separate module. Each module can provide any number of sensors; for example, the CPU module provides both the total CPU usage and the usage for each logical CPU, split into different sensors. However, each module can only report data to a single MQTT topic, using value templates to extract data for different sensors. All sensor modules must implement the Sensor trait:
trait Sensor: 'static {
    type Payload: Serialize + 'static;
    fn topic(&self) -> &str;
    fn discovery_data(&self) -> Vec<SensorDiscovery<'_>>;
    async fn get_status(&self) -> Result<Self::Payload, Error>;
}
Here, discovery_data is called when the service starts to generate discovery information, allowing Home Assistant to set up and receive the relevant sensor status information. get_status is called periodically to obtain sensor data for sending. The discovery data and the status payload need to work together to ensure the sensor information is displayed correctly. For example, the data sent by the CPU sensor looks like this:
{
  "total": 0.4,
  "per_cpu": [0.3, 0.5, 0.5, 0.4]
}
And their discovery data will specify:
// CPU Usage
"value_template": "{{ value_json.total }}",
// CPU0 Usage
"value_template": "{{ value_json.per_cpu[0] }}",
Data from different sensor modules doesn’t need to be sent simultaneously; the sensor loop sends the data when the corresponding get_status returns. For instance, the CPU sensor monitors the CPU usage over the past minute, so it only has data to report one minute after the service starts. In contrast, the memory module simply reads /proc/meminfo to get data and can return immediately. In this case, the memory status is sent first, and the CPU status is sent later when data becomes available.
The CPU sensor is a particularly tricky one. Although it’s just a simple percentage in many system monitoring tools, the system doesn’t provide this percentage directly; it needs to be calculated. The implementation here is to read /proc/stat once a minute in a separate loop to get the total number of cycles the system has spent on different tasks. Based on this data, it calculates the proportion of busy cycles to total cycles over the past minute and sends the result to a channel. Each time get_status is called, it reads the last updated data from this channel and returns it. Taking a one-minute average here is a trade-off. Most local monitoring software might use a very short sampling interval, making CPU usage changes appear continuous. However, for reporting to a remote system, especially with a default reporting interval of 5 minutes, data from a 100-millisecond or even a one-second sampling interval seems less meaningful. Therefore, I chose to use an average over a longer period.
Similar to the CPU sensor is the network throughput sensor, which also uses a separate loop to sample the total amount of data transferred and then divides by the sampling interval to get the throughput rate.
Most other sensors are much simpler, basically just parsing data provided by the system. For example, the memory sensor reads /proc/meminfo, the load sensor reads /proc/loadavg, the disk sensor uses the statvfs call, the APT sensor runs apt-get --just-print, and the reboot sensor reads /var/run/reboot-required and /var/run/reboot-required.pkgs, etc.
Command Buttons
Similar to sensors, each command button is also a separate module, and they each implement the Command trait:
trait Command: 'static {
    fn topic(&self) -> &str;
    fn discovery_data(&self) -> Vec<CommandDiscovery<'_>>;
    async fn execute(&self) -> Result<(), Error>;
}
The existing command buttons simply run a command. Home Assistant doesn’t support command buttons returning any information, not even success or failure, so the internal interface and implementation are also very simple.
However, a complexity in implementing command buttons comes from privilege management. As a security best practice, the service itself should run as a non-privileged user, but commands like rebooting or suspending require root privileges. The solution is to configure the sudoers file to allow these specific commands to be executed by the service’s user without a password:
ubuntu-mqtt2ha-reporter ALL=(root) NOPASSWD: \
    /usr/bin/systemctl reboot, \
    /usr/bin/systemctl suspend
Discovery Data
Discovery data uses Home Assistant’s device-based discovery mechanism, so all sensors and command buttons are included in a single discovery data message. In my initial implementation, as well as in RPi-Reporter-MQTT2HA-Daemon’s implementation, a separate discovery message was sent for each entity. This approach resulted in a lot of redundant information in each discovery message, such as device identifiers, connection information, availability topics, etc. The device-based mechanism solves this problem.
The unique device identifier is generated using the method recommended in the /etc/machine-id documentation: read the identifier stored in this file, add an application-specific key, and then perform a cryptographic hash, using the result as the identifier. Although systemd provides the sd_id128_get_machine_app_specific function, for reasons I can’t recall, I implemented it myself with HMAC-SHA256 according to the algorithm described in the documentation.
Lifecycle Management
Using rumqtt to manage the MQTT connection is not complex, but there are some subtle tricks. This package relies on the user to create an event loop to drive message sending and receiving. This means the event loop must run in its own separate coroutine, not sharing one with the message sending and receiving code. This coroutine needs to start before sending message or making subscription, and it must only end after all messages have been sent.
As mentioned earlier, one of the loops in the main loop periodically sends availability status. This loop is also responsible for sending a message to mark the device as unavailable when the service is about to shut down. This means we must ensure that the MQTT event loop only terminates after this ‘unavailable’ message has been sent. You could say that the four loops in the main loop are not equal:
- The lifecycle of the sensor status publishing and command receiving loops are not critical. When the service is about to shut down, we don’t care if they have received or sent anything, so they will terminate along with any other loop that exits.
- The availability loop is different. We need to ensure it has a chance to send its final message, so it is designed to initiate the disconnection after sending this message.
- The event loop will exit when it processes the disconnection request. The main loop, after the other three loops have exited, will additionally wait for the event loop to finish, ensuring the process does not exit until all messages are sent.
There are two ways to request the main loop to terminate:
- Receiving a
SIGINTorSIGTERMsignal, where the system requests the process to stop. This is a common way to end the main loop during debugging or when systemd stops the service, and it will cause the entire process to exit. - Detecting that the system is about to go to sleep. While running, this service holds a systemd inhibitor lock, and once it detects that the system is about to sleep, the main loop is also terminated to ensure the device is correctly marked as unavailable before sleeping. Then, after the main loop ends, the service releases the inhibitor lock and waits for the system to wake up again.3
Debian Package
In the beginning, I deployed this service by simply copying the files to the target device and configuring it manually. But as the number of deployed devices grew and versions were updated frequently over a period, manual deployment became very tedious. Although I considered some automated configuration solutions, I ultimately thought, since my target is only Ubuntu devices, wouldn’t using the built-in APT package manager with Super Cow Powers be the most convenient?
A search revealed the cargo-deb tool, which supports directly packaging a Rust project into a .deb file, so I used it. Using a .deb package, I could automate the creation of necessary users and groups, configure the systemd service, set up the sudoers file, and so on. Later, for even easier deployment, I also set up a private APT repository and configured my target machines to update from it automatically.4 Setting up a private APT repository is yet another topic on its own.
Use Cases
The biggest use case for this service is, of course, monitoring various devices. I’ve deployed it on my VPSes and the Ubuntu devices at home to monitor their status. Because there’s a sensor that shows if a device needs to be rebooted to apply updates, and a command button to reboot it directly, I can restart devices pending a reboot directly from Home Assistant without having to SSH into them first. Although this process could be fully automated, I still want to keep a manual part to it.
Besides that, I also use the information it provides for other automations. For example, I have a computer connected to my TV at home that acts as a simple set-top box, playing content that for some reason can’t be played directly on the TV. After I bought a Nintendo Switch, I noticed that if the Switch is connected to the TV, turning on the Switch automatically turns on the TV and switches to its input source. And when I turn off the TV, the Switch also turns off automatically. After some research, I believe this is controlled by the HDMI-CEC mechanism. However, although my cable supports HDMI-CEC, the graphics card in the connected computer does not. But with this service, I can set up a Home Assistant automation that detects when this computer wakes up and automatically turns on the TV and switches the input source. I can then set up another automation that detects when the TV is turned off and automatically puts the computer to sleep.
Future
My own needs have been mostly met, so this project might become inactive again for a while.
Some possible future improvements include:
- Extending support to Raspberry Pi OS. Raspberry Pi OS is also Debian-based, so extending the existing functionality to it shouldn’t be too difficult. It would also help me replace RPi-Reporter-MQTT2HA-Daemon on my current Raspberry Pi nodes. But this would require me to be able to build aarch64 packages.
- This might not be very difficult, but I don’t have major complaints about the current Raspberry Pi reporter, and without a specific need, I’m not motivated to mess with the nodes that are currently running stably.
- Adding more reported items, such as device manufacturer and model, CPU temperature, etc.
- How to obtain this information reliably and make it meaningful for both local devices and VPSes will require some thinking.
- Setting up a public APT repository to make installation and deployment easier for others.
- I’m not sure how much demand there would be for this, nor what the best way to do it is. One possibility is to use Launchpad; another is to use my own VPS or additional object storage as an APT repository.
In any case, I think the project is in a reasonably usable state right now. If you have any suggestions or improvements, feel free to open an issue or a pull request.
Footnotes
-
My current favorite used SFF is the Dell Wyse 5070 series thin client. Its power consumption is close to a Raspberry Pi, but its performance is quite good. In fact, my Home Assistant initially ran on a Raspberry Pi 4B, which I later migrated to a 5070. After the migration, the load and core temperature dropped significantly, and tasks like updating add-ons became noticeably faster. ↩
-
Although the INI format might have been sufficient for the current configuration items, TOML offers more possibilities, has a more complete format definition, and has more mature support in Rust. ↩
-
Initially, my approach was to place a script in
/usr/lib/systemd/system-sleep/to automatically stop the service before the system sleeps and resume it upon waking. When I wanted to package it as a .deb file, I read the documentation and discovered this method is considered a hack. The more correct approach is to use an inhibitor lock, so I switched to that mechanism. ↩ -
Packages built by cargo-deb were originally not supported by unattended-upgrades. I submitted a PR for it to make the generated packages more similar to other .deb packages for broader compatibility. ↩